Wednesday, March 29, 2023

Enjoy the journey

 Hi everyone,

Today I have a card to share using a bunch of Tim Holtz Idea-ology and a Sizzix die and Stampers Anonymous stencil and also a stamp set.


I started with a white panel and blended Distress Prize Ribbon ink over top. I


I added some Distress Icicle Crackle paste over a few areas.


When that was dry I lightly sprayed the panel with a bit of Blueprint Sketch Distress spray stain.


I die cut the butterfly with white card stock and blended Prize Ribbon Distress ink over top. I added gold metallic rub-on lightly to the raised areas.


I added bits of Idea-ology from different ephemera sets on to my card.
The whole panel was mounted on to a sheet from the Idea-ology Backdrop #4 pack and then mounted to a piece of gold striped metallic card stock.

I also added a quote chip for my sentiment and an Idea-ology metal star coloured with Prize Ribbon crayon.

Well that’s it for my card and thanks so much for stopping by 🙏🏻❤️

Supplies:
Sizzix / Tim Holtz Butterfly 3-d Impresslits 
Stampers Anonymous Digits stencil and Ultimate Grunge stamp set
Distress Prize Ribon ink
Distress Blueprint Sketch Spray Stain
Ranger Prize Ribbon crayon
Idea-ology ephemera, metal star and quote chip sentiment 
Gold rub-on


Wednesday, March 08, 2023

Spring is coming

 Hi everyone, 

Today I have a rather large Spring tag to share with you. That bird is a big bird so I needed the space😀


I started by creating my bird and egg first. I then went onto the background of the tag.

I used a stencil and some Distress inks. Then I added a layer of Distress paste off top.
In different places I added some stamped writing and images to the background. I also distressed the edges of the tag with my Tim Holtz distressing tool.


I added an Idea-ology flower to the tag which I had coloured with Distress crayons. I had die cut the letters Spring from a piece that I had alcohol inked and had added silver foil to.


The butterfly is an ephemera Idea-ology piece. 
You can see the crackle in the photo above and below.


I die cut some branches and foliage. I also added trim to both the top and bottom of the tag.
The tag was mounted to a piece of cork and clipped at the top with an Idea-ology clip.


I added an Idea-ology sentiment and the numbers 2 and 0 were die cut signifying the first day of Spring for 2023.


You can see the Icicle paste crackle below.


Well that’s it for today and thanks so much for stopping by 🙏🏻

Supplies:

Tim Holtz / Sizzix Alphanumeric die
Tim Holtz / Sizzix Bird and Egg die set
Tim Holtz / Sizzix Holiday greens die set
Tim Holtz / Sizzix Fall Foliage die set
Tim Holtz / Sizzix Alphanumeric Bold die set
Tim Holtz / Stampers Anonymous Floral stencil
Distress Icicle crackle paste
Distress inks
Tim Holtz Idea-ology
Ranger alcohol inks


Monday, February 20, 2023

You do you tag

 Hi everyone,

Today I have a tag to share using the beautiful Blossom die from Tim Holtz/Sizzix.


I started by creating my tag background using Distress spray stains and a Mica spray stain.


I added a brick stencil with Distress texture paste.


Each layer of the flower was created by smooshing the colours on using my glass mat. I added the ink pad colour to my mat, spritzed with a bit of water and then smooshed on the colour.


I stamped a sentiment stamp with black ink to different sections of the tag.here and there.


Added a label sticker from Idea-ology and some brown pearl embellishments and that completes my card. Thanks so much for stopping by 🙏🏻

Supplies:

Tim Holtz / Sizzix Blossom die
Stampers Anonymous Ledger Script stamp, Bricked stencil
Idea-ology Label stickers - Thoughts, Mummy cloth
Distress sprays - Peacock Feathers, Rusty Hinge, Walnut Stain
Distress oxide spray - Salvaged Patina
Distress Mica spray - Tarnished Brass
Distress inks - Mermaid Lagoon, Wild Honey, Walnut Stain

Friday, February 17, 2023

Fun specimen slides/tags

 Hi everyone,

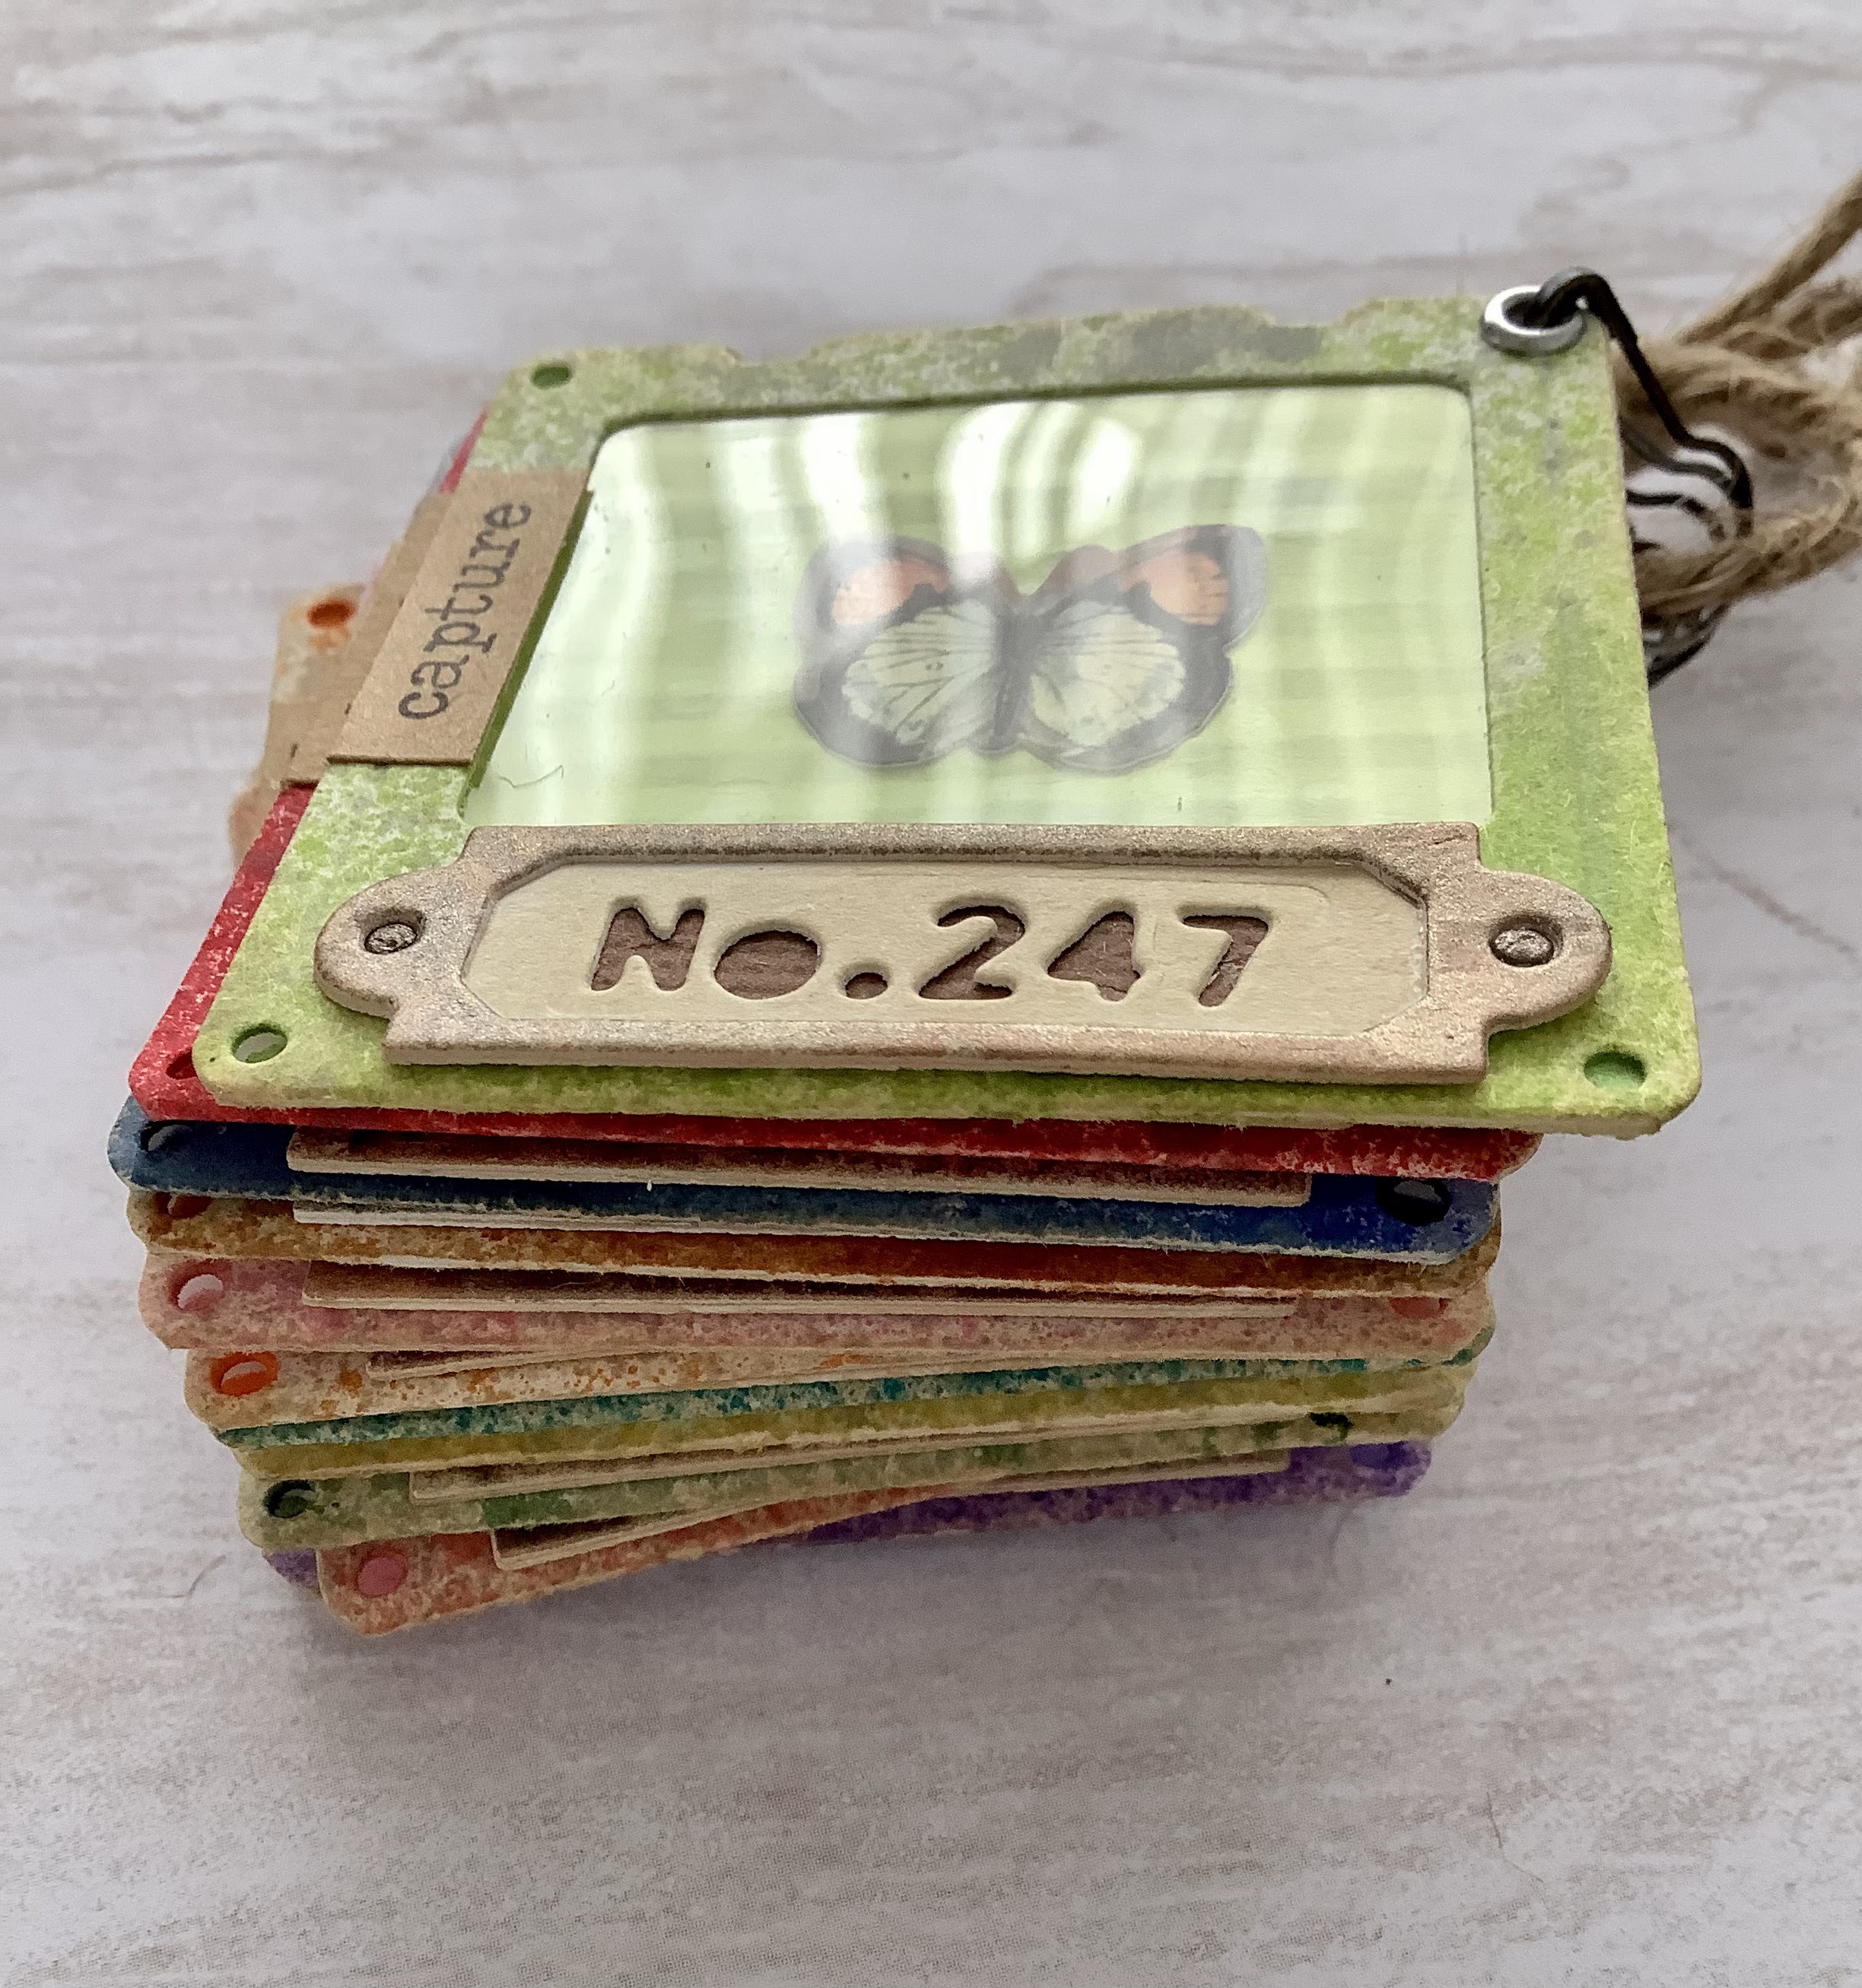
Well Valentine’s Day is behind us now   so I thought I would work on something a little different. Making some little specimen slides. There are 12 in all.


I started by die cutting each slide and then spraying it with Distress Spray stain and then I used the matching ink pad colour to colour the background for each slide. I also added a few sprays with Lost Shadow Distress spray.


I ran the background piece through my corrugating roller. I then added a few drops of water to each piece.


I added an Idea-ology Ephermera or layer piece to each slide before adding a piece of acetate over top.


For the frame around the die cut word or number I sprayed a piece of card stock with Distress Mica sprays in Brushed Pewter, Antique Bronze and Tarnished so as to give the a metallic finish. I added a strip of brown card stock behind the word or number piece before adhering with tape.


On the top right corner I added an eyelet in either silver or copper and then attached an Idea-ology loop pin.


The word on the left of each slide is an Idea-ology Chitchat sticker.


Below is a photo to see all the Idea-ology sticker words on each slide.


Below are the 12 slides attached with Jute rope.


Here they are stacked.


I had so much fun making these and I hope you enjoy them too. Thanks so much for stopping by🙏🏻

Supplies:
Tim Holtz /Sizzix Specimen die set 
Idea-ology Layers, Ephemera packs
Idea-ology Loop pins
Eyelets
Jute rope
Distress Spray and ink pads - 
Squeezed Lemonade 
Twisted Citron
Carved Pumpkin
Kitsch Flamingo 
Salty Ocean
Rustic Wilderness 
Saltwater Taffy
Rusty Hinge
Blueprint Sketch
Wilted Violet
Candied Apple 
Cracked Pistachio 
Lost Shadow
Distress Mica sprays - Antique Bronze, Brushed Pewter, Tarnished Brass


Sunday, January 29, 2023

Happy Day

Hi everyone,

Well it’s another snowy day here so it’s time to play in my craft room.

I had coloured some Idea-ology eggs and rabbits the other day it was time to make something with them. I chose to create a tag.


I started with a Kraft coloured tag glued to a piece of chipboard. I added layers of Distress spray and  some stamped images in black ink.


The rabbit was painted with Walnut Stain Distress paint and the eggs with alcohol inks. The paper grass is from my stash.I also added a google eye to the rabbit.


I added a hinge clip to the top of the tag that was painted with Tarnished Brass Distress paint.
I used Star stencil on the background and also a Woodgrain stencil.


All the sentiments were from the Stampers Anonymous Eccentric stamp set. The round piece was embossed with gold embossing powder. The hand is an Idea-ology piece. 


I stamped some gold stars and some lettering also from the Eccentric stamp set.
I added some Crackle paint to parts of the edges of the tag and also added bits of Tarnished Brass paint to the edges and bottom.


I made a shelf for the bunny and eggs to sit on using a strip of chipboard to which I added a strip using a Decorative Trim die. The shelf was painted with Kitsch Flamingo Distress paint.

The sticker is from the Idea-ology Sentiments Label stickers.

Well that’s it for my tag today and thanks so much for stopping by 🙏🏻

Supplies:

Stampers Anonymous Eccentric CMS448
Stampers Anonymous Spring Shadows CMS393
Sizzix Decorative Trims die set 665435
Stampers Anonymous Woodgrain stencil, Star stencil 
Idea-ology Sentiment label stickers
Idea-ology rabbit and mini eggs
Distress crackle paint translucent
Distress Villainous Potion ink pad, spray stain and oxide spray
Distress paint Tarnished Brass

Sunday, January 15, 2023

A grateful heart

 Hi everyone,

Well after watching Tim Holtz’ YouTube live yesterday I decided on making this card.


I embossed the background using the new Tim Holtz and Sizzix Entangled embossing folder on metallic card stock.

I also die cut the heart with shiny metallic silver card stock and added Black Soot Distress crayon to the edges of the heart.


After it was embossed I dabbed Candied Apple Distress paint over top and then wiped off with a paper towel.


I then took my sander and lightly sanded off some of the raised parts of the background.


The sentiment is from Stampers Anonymous and embossed with silver embossing powder on to black card stock.

I then dabbed Black Soot Distress paint here and there and lightly wiped off.


The whole process really makes for a great background and is quick and easy to do.

Well that’s it for my card and thanks so much for stopping by🙏🏻

Supplies:
Tim Holtz Entangled embossing folder 
Tim Holtz Lucky Love Impresslits
Distress paint - Candied Apple, Black Soot
Distress crayon - Black Soot
Stamper’s Anonymous Tiny Text CMS394
Idea-ology sanding block


Thursday, January 05, 2023

Gladys and her scarf

Hi everyone,

I haven’t had Gladys out for a while and thought it was time she showed herself again. So she wouldn’t be too cold (after all it is Winter here) I gave her a hat and a wrap around scarf. Also added a bit of tinsel to her hat.

Here she is.


I first starting by creating my background using two different colours of Mica spray.
I then applied a Rose stencil using translucent crackle paste over top.


The crackle paste gives such fine detail cracks.
I also sprayed a bit of the 2 colours over top of the crackled image once it was dry. 


I added a Ledger Script stamp with black ink to the areas where the crackled image wasn’t.


The script just adds a little something to the card front.


Well that’s it for my card today and thanks so much for stopping by 🙏🏻

Supplies:

Tim Holtz Sizzix Gladys die set
Tim Holtz Sizzix Bold Text 2 stamp set
Stampers Anonymous Ledger Script stamp
Stampers Anonymous Floral stencil
Mica Stain spray - Cocktail Party, Merriment
Idea-ology silver tinsel


Tuesday, January 03, 2023

Little Snowman house

 Hi everyone,

Well I’m off to a good start for 2023 with my first make for this year. 


I started with the 2nd smallest size of the Idea-ology Vignette boxes which measures 2.75” wide by 4”tall.

The background piece to my box was inked with Salvaged Patina and Tumbled Glass.I added the Star mini stencil over top with Distress grit paste and Clear Rock Candy glitter over top. 


To the four outer edges of the box I added Distress Matte texture paste.


I used the Tim Holtz Lumber embossing folder to cover the sides and top of the box. I used Speckled Egg distress ink with a touch of Walnut Stain to colour the pieces.


To the top windows of the frame I added a strip of acetate which I had added Snowfall Grit paste using the snowfall stencil from this year’s Simon Says Stamp Stamptember and Tim Holtz collaboration stamp set.


To the inside walls of the box I added pieces that were embossed using the Tim Holtz mini Brickwork 3-d embossing folder.


I used a frame piece from Idea-ology which I distress with inks and a bit of crackle paste. To the inside floor of the box I added distress paste and mica flakes.


The snowflake is an Impresslits folder. I inked it with Peacock Feathers distress ink and added Statue Foundry wax to the edges.

The snowman was painted with Distress paints and grunge duo a bit with a Walnut Stain Distress crayon.


The sentiment strip at the bottom is Idea-ology. I also added a strip of red velvet ribbon under my snowflake.

Well that’s it for my little snowman box.

Thanks so much for stopping by 🙏🏻

Supplies: 
Idea-ology Baseboards Frames
Idea-ology Vignette Boxes
Idea-ology Worn Wallpaper scraps - Christmas 
Idea-ology Snowman
Sizzix Lumber embossing folder
Sizzix Mini Brickwork embossing folder
Sizzix 3-D Impresslits snowflake
Stampers Anonymous Stamptember 2022 stamp set
Stampers Anonymous Mini stencil set #44
Distress inks - Salvaged Patina, Tumbled Glass
Distress Snowfall grit paste
Distress Grit paste and Matte Texture paste
Distress Mica flakes
Red velvet ribbon