Saturday, February 05, 2022

Cheery Alcohol ink card

 Hi everyone,

I have a nice cheery card to share today on another cold winter’s day here in Montreal. Thought this would also be perfect for the current ‘Anything Goes’ challenge at a Blog Named Hero. Details can be found here


I was playing around with my Alcohol inks and decided to create a background with 3 colours of Alcohol ink. Not sure what I was going to do with the finished panel so I decided to use the Hero Arts Sun Flare die with black card stock to go over top for some nice contrast.

The Love sentiment was die cut a few times with white card stock and glued together.

The You letters are from the Tiny Alphabet die set from Tim Holtz.

All the elements were glued directly to my card base to complete my card.

Well that’s it for my card today and thanks so much for stopping by 🙏🏻

Supplies:

Hero Arts Sun Flare window die
Lawn Fawn Scripty Love die
Tim Holtz/Sizzix Alphanumeric Tiny Type Uppercase Letters die set
Alcohol inks - Flamingo, Patina, Limeade


Wednesday, February 02, 2022

Love you heaps

Hi everyone,

Today I have another creation that I made after last Saturday’s Tim Holtz live.


I started by creating my box using the Sizzix Lumber embossing folder. I embossed Kraft card stock twice and then began applying Distress inks until I had the wood colour I was looking for.

I cut the panels in strips and glued them to the sides of my box. I took a Tim Holtz stencil and blended red ink over the stencil. After I had finished blending I left the stencil in place and added some paint in certain areas.

The hearts were created with a heart stencil that I had applied some Distress texture paste over top. When the paste was dry I added some red paint over top of the hearts. I let it dry and cut out the hearts. To some of them I added Mica flakes which I had created with Red Pepper  alcohol ink and the others some glitter powder.

The panel was added to the front of the box and and I accented it with a stitched frame in gold card stock.

I added a piece of red velvet ribbon around the box and topped it out with a gold puffy heart and the sentiment.

Well that’s it for my little Valentine project ❤️ and thanks for stopping by 🙏🏻

Supplies:

Tim Holtz stencils - Hearts, Flourish
Tim Holtz 3-D Texture Fades Lumber embossing folder 
Simon Says Stamp Stitched Square dies
Red Acrylic paint
Distress inks - Walnut Stain, Vintage Photo, Festive Berries
Distress Mica flakes
Distress Texture Paste - matte
Alcohol ink - Red Pepper


Sunday, January 30, 2022

It’s a wonderful life

 Hi everyone,

Well yesterday Tim Holtz had a YouTube live for 3 hours. So much fun. ❤️ Although the theme was Valentines I couldn’t resist creating a winter themed card using one of his ideas from the live. This is one of the projects I made from that. I do have a Valentine project also which I will post later.


I created my background with a piece of wood grain card stock and blended distress inks over top - Walnut Stain, Vintage Photo, Mermaid Lagoon. I sprayed the panel with Distress Resist spray which gives a nice glossy finish.

I used the Impresslits 3-D snowflake folder with white card stock for the snowflakes and added flicks of gold spray to them.

I added an Idea-ology Christmas word plaque with some jute. I also blended a little bit of  Hickory Smoke Distress crayon over top of the word.

Well that’s it for my card and thanks so much for stopping by.

Supplies:
Simon Says Stamp woodgrain card stock
Sizzix / Tim Holtz Snowflake 3-D Impresslits folder
Tim Holtz Idea-ology Christmas word plaques
Distress inks & crayon
Heidi Swapp Gold Color shine spray


Thursday, January 20, 2022

Let It Snow

Hi everyone,

Well we’ve had quite a lot of snow lately so I thought this card was perfect for the occasion.


I created my background with a snowflake stencil and 2 different colours of Distress inks.

It actually looks like more colours but I blended them together to create different colours.
The sentiment was die cut 3 times, twice with white card stock and again with patterned card stock.

Before I added everything to my pink card base I added some white Gina K glitz glitter gel to a few of the snowflakes.

Once that was dry I assembled my card and that’s it.

Thanks so much for stopping by 🙏🏻

Supplies:
Lawn Fawn Lots of Hearts background stencil
Lawn Fawn Giant Let it Snow die
Distress inks- Speckled Egg, Spun Sugar
Gina K Glitz Glitter gel - white


Thursday, January 13, 2022

You’re just too sweet

 Hi everyone,

Today’s card is one that I am entering into the current Simon Says Stamp Flickr challenge where the theme is “To Die For”.


I had already die cut the red poinsettias and green leaves for another card that I never got around to making so I used them in this card.

I ran a white stitched panel through my die cutting machine with the Poinsettia die. I then blended some Distress ink over where the die cut pieces would be inlaid. I adhered this panel to a piece of black card stock and then added that to my white card base.

I then went on to adding all the pieces into my card. The sentiment is from Paper Rose which I added to my card with some foam tape.

To finish off the card I added small crystal gem accents here and there.

Well that’s it for my card and thanks so much for stopping by 🙏🏻

Supplies:
Simon Says Stamp Poinsettia Parade die
Simon Says Stamp Stitched Rectangular die
Paper Rose pre printed sentiments
Distress ink - Twisted Citron 
Embellishments 


Wednesday, January 12, 2022

Happy Birthday hearts

Hi everyone,

Today I have a card to share for the current Lawn Fawn challenge where the theme is “Let’s Celebrate”
and the Simon Says Stamp “Fun with Stencils” Wednesday challenge which can be found here


I started by applying the new heart stencil to a piece of Lawn Fawn patterned paper and blended Dried Marigold Distress ink over top. I then applied the 2nd heart stencil and blended Picked Raspberry Distress ink over top.

I cut the panel down using a stitched rectangle die. I had a frame of glittered cardstock left over from a previous project so I added that to my card base of patterned paper.

The small stamped images were coloured with Copic markers.

The words were die cut from red and orange card stock and glued together slightly offset.

Everything was added to the card with foam tape. I also added some accents to the words with a sparkle marker.

Well that’s it for my card and thanks so much for stopping by 🙏🏻

Supplies:
Lawn Fawn Lots of Hearts Background stencils 
Lawn Fawn Scripty Happy die
Lawn Fawn Scripty Birthday die
Lawn Fawn Tiny Friends stamps and dies
Lawn Fawn 6x6 paper packs - Spiffy Speckles & Watercolor Wishes Rainbow 
Simon Says Stamp Stitched Rectangle die set


Friday, December 31, 2021

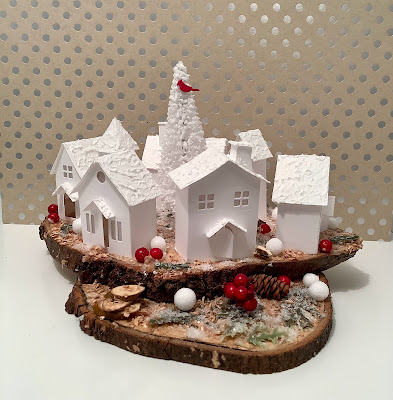
Winter White village

Hi everyone,

Today I have a fun project to share that was very time consuming but crazy enjoyable to create using the Tim Holtz village series dies.

This is my village.

I created 6 houses for my piece.

My husband cut a couple of nice wood slices from some firewood that we had and I built up my village from there. The only thing I wish I had when making this were some Distress Mica flakes. They would have added a nice touch. I used what I had on hand from the $$ store.


I used 2 large wood slices and glued them together a little offset for my base. I added a bunch of wood shavings, glitter, red berries, branches, pine cones, styrofoam balls etc. I adhered all the houses and added my white tree to the middle.

I added Aleene’s Glitter Snow paste to all the roof tops and doorway peaks to add a subtle sparkle. The red bird is a die from Lawn Fawn.

Overall size is approximately 8.6” L x 6” W.

Well this is it for my project and stay tuned for my house projects as I now have the 87 piece set from Sizzix and Tim Holtz.

Supplies:
Sizzix/Tim Holtz Thinlits 664741 & 665585


Wednesday, December 29, 2021

Holiday note

 Hi everyone,

Well it’s been a while since I have posted here but I hope you have all had a joyful Christmas as much as anyone can under the current circumstances.

Well that said I have a card to share with you today.


I started with a green stitched panel and adhered my stencil from the Warm Wishes Collection by Vicki Boutin and then added green glitter over top. 
I added red Stickles to the berries and set the whole thing aside to dry.

The sentiment was stamped on black card stock and heat embossed with white embossing powder.
I used the coordinating die to cut it out.

I adhered my panel to a lighter piece of green card stock and then added it to my white card base.

This is a pretty quick card and oh so pretty with all that glitter.

Well that’s it for my card and thanks so much for stopping by🙏🏻

Supplies:

Vicki Boutin Warm Wishes stencil collection - Christmas Pine Tree Foliage pattern
Simon Says Stamp Stitched Rectangle die
Pinkfresh Studio Perfect Sentiments Holiday - stamp and die set
Gina K Glitz Glitter gel - Grass Green
Stickles - Christmas Red
White embossing powder

Monday, November 22, 2021

Peace & Joy

 Hi everyone, 

Today I have a stencilled card to share with you.

I used a new stencil from Vicki Boutin and some Distress inks.


I adhered my stencil to a piece of white card stock and starting from the centre of the stencil blending first the purple colour and then blending a blue ink colour to the edges.

Once I was finished with the blending I ran my piece through my die cut machine using a stitched rectangle die.

I added my panel to a white card base and added a sequin to the centre of where each of the star design meets.

The sentiment was stamped onto a piece of black card stock and heat embossed with silver embossing powder.

Well that’s it for this card and thanks so much for stopping by 🙏🏻

Supplies:
Vicki Boutin Warm Wishes stencil set
Pinkfresh Studio Perfect Sentiments - Holiday stamp and die
Simon Says Stamp Stitched Rectangle die 
Distress inks - Wilted Violet, Blueprint Sketch 
Silver embossing powder 
Sequins - Studio Majestic Confetti 


Monday, November 08, 2021

Snowflake greeting

 Hi everyone,

Today I have a card to share using alcohol inks. I guess I was on a bit of a roll with alcohol inks lately.


I created my background using 3 colours of ink.

Once I was happy with the blending I set the piece aside to dry.

I die cut the snowflake using Thermoweb Deco Foil.

The sentiment was stamped with black ink and adhered to my card with foam tape onto a circle die cut piece of turquoise card stock.

Well that’s it for my card and thanks so much for stopping by 🙏🏻

Supplies:

Lawn Fawn Magic Iris Snowflake add on die
Lawn Fawn Magic Holiday Messages stamp set and die
Simon Says Stamp Stitched Circle die
Alcohol inks - Limeade, Glacier and Laguna
Thermoweb Deco Foil - Silver Stars