Showing posts with label MFT stamps. Show all posts

Wednesday, May 19, 2021

Thanks for thinking of me

Hi everyone,

I have a watercoloured card to share today using a large background stamp which was heat embossed with white embossing powder.


I stamped a piece of watercolour card stock with my image. I then started to add some watercolours in yellow and green.


 I cut a die cut sentiment directly through my finished panel. I layered several pieces of the sentiment together that were all cut from white cardstock.

The other sentiment was stamped on a strip of black card stock and embossed with white embossing powder.

I added the panel directly to my card base, glued in the die cut word and added the stamped sentiment with foam tape.

Well that’s it for my card and thanks so much for stopping by 🙏🏻

Supplies:

MFT Floral Fantasy background stamp
Simon Says Stamp Painted Thanks die
Simon Says Stamp Thanks stamp set
Gansai Tambi watercolours

Thursday, February 18, 2021

For you

Hi everyone,

I have a fun card to share using a large background stamp, 2 Distress re-inkers (embarrassed to say the only 2 I own) ☺️ and Gansai Tambi gold paint.


I started by stamping my large floral background stamp with Versamark ink onto a piece of watercolour card stock that had been cut with a rectangle stitched die.

I then heat embossed it with textured white embossing powder from Lawn Fawn. 

I used drops of re-inkers in 2 different colours and then added some water. I moved the panel around so I could disperse the colours over the panel. I then added a bit of gold paint in different areas for a nice bit of shine here and there.

I was quite happy with the way the panel turned out as it looks nice and aged.

I die cut the large sentiment from some shiny gold card stock. The other sentiment was cut from the black & white sentiment sheets pack from Paper Rose.

I added the panel with foam tape to a stitched scalloped panel of turquoise card stock. 

Well that it for my card and thanks so much for stopping by 🙏🏻

Supplies:
Simon Says Stamp Stitched Rectangle die set 
My Favorite Things Floral Fantasy Background stamp
Lawn Fawn Outside In Stitched Rectangle Stackables die set
Lawn Fawn For You die
Distress re-inkers - Tumbled Glass & Shabby Shutters
Lawn Fawn Textured White embossing powder 
Paper Rose sentiment sheets pack
Gansai Tambi Bluish Gold paint
Versamark watermark ink pad


Thursday, September 03, 2020

Pink princess

 Hi everyone,

Today's card is 1 of 2 that I have made using Lawn Fawn's Build-A-Castle die set. It will be going to my sweet little granddaughter in Hawaii.


I first started by stamping, colouring and diecutting all the pieces. I used a Brick stencil to create the pattern for the castle walls.

I then moved onto creating the background on my card base using different colours of pinks and red inks.

The pink panel was die cut using a tree border die and the sentiment was stamped onto it and heat set with silver glitter embossing powder.

I added water splatters to my background and then started to assemble my scene with some of the pieces taped flat and others popped up with foam tape.

I must admit I had so much fun making this card that I have made another one which is more masculine. 

Well that's it for my card and thanks so much for stopping by.

Supplies:

Lawn Fawn Build-a-Castle die set
Lawn Fawn Tiny Fairy Tale stamp set
Lawn Fawn Unicorn Picnic stamp set
Lawn Fawn Cloud Border dies
Lawn Fawn Forest Border die
MFT English Brick stencil
Stickles glitter 
Copics

Monday, August 31, 2020

Aloha Missing your smile

Hi everyone,

Today I have a card to share using some Alcohol Pearl inks and an Alcohol Lift-ink pad.
When I made this card I had my daughter in mind who lives in HawaiiI and I thought all the different colours were a nice mix.

I started by blending 3 different colours of Alcohol Pearl inks onto a piece of Yupo paper and achieved such an array of  beautiful colours. Once dry I used my Alcohol Life-ink pad with a large MFT background stamp to stamp directly over my blended background. The design is very subtle in the background.


I then die cut the panel using once of the larger Inifinity Hero Arts Postage Stamp dies. I die cut the Aloha several times with white cardstock and glued them altogether to create a thick sentiment. The other sentiment was cut from a Paper Roses sentiment paper pack.

I adhered the whole panel to my card base with foam tape.

Well that's it for this card and thanks so much for stopping.

Supplies:

Alcohol Pearls - Intrigue, Sublime and Tranquil
Alcohol Lift - ink
My Favorite Things Floral Fantasy stamp
Hero Arts Inifinity Postage Stamp die set 
Lawn Fawn Aloha die
Paper Roses sentiment pack
Yupo paper


Sunday, May 31, 2020

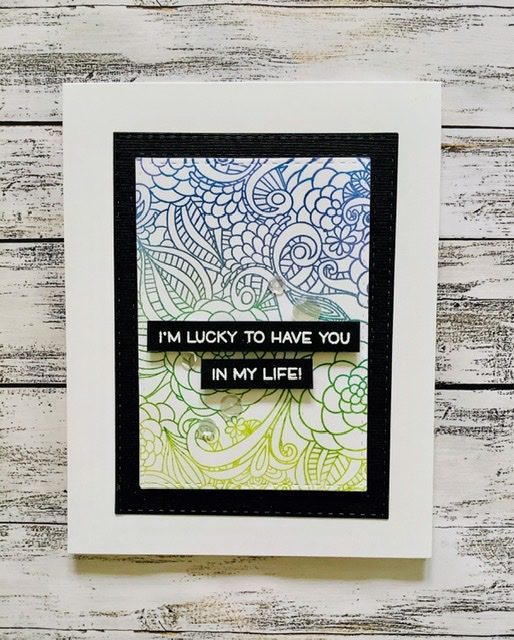
Lucky to have you

Hi everyone,

Today I have a card to share using the large Floral Fantasy background stamp from MFT stamps.


I started by setting the stamp in my Misti rubber side up in the platform. I taped my die cut rectangle piece to the door of my Misti aligning it to the centre of the stamp. I used a Kaleidacolor ink pad which has 5 different colours of ink and inked up the stamp. I had to do this several times in order to get a crisp image. I did use a different ink on the top portion as I wanted to have a dark blue colour with the greens.

I used 2 of the stitched rectangle dies to make the frame for my image from some black cardstock. The sentiment was stamped and embossed with white embossing powder.

I popped both the background and the sentiment pieces with foam tape.

I added a few clear sequins and that completes my card.

Thanks so much for stopping by.

Supplies:

MFT stamps Floral Fantasy Background Stamp
Lawn Fawn Reveal Wheel Friends & Family sentiments Stamp set
Simon Says Stamps Stitched Rectangle die set
Tsukineko Kaleidacolor Fresh Greens ink pad 

Sunday, December 08, 2019

Holiday Snowflakes

Hi everyone,

Today I have 2 cards to share that I created using both the positive and negative from a large snowflake die.

I started by cutting a large panel with a stitched rectangle die and then cut a snowflake from the white piece. I then moved onto die cutting the snowflake from a few different colours of cardstock. I carefully taped all the snowflake pieces together on the back side and then laid them into the snowflake cutout background.

I added foam tape to the back of the panel and adhered it to the card base which was lined with a piece of diagonal stripe patterned paper.


For my second card I die cut the snowflake from a white panel. The background to my snowflake was created by blending 3 different colours of distress oxide inks. I added some white splatters to the panel and adhered it to my card base. I applied foam tape pieces around the edges of the snowflake and turned it into a shaker card using Snow Flurries mix from Taylored Expressions.

Both sentiments are from MFT stamps.


Well that's it for both cards and thanks so much for stopping by.

Supplies:

Impression Obsession Snowflake die - DIE093-X
Simon Says Stamp Stitched Rectangle die set
Distress Oxide inks - Salty Ocean, Peacock Feathers, Broken China
Taylored Expressions Snow Flurries sequin mix

Wednesday, December 04, 2019

From our home to yours

Hi everyone,

Today I have a card to share using Altenew's Leaves & Berries stencil.


I applied the stencil to my card and started to blend the berries and leaves with Distress Oxide inks masking off the berries and then the leaves. I laid the stencil back down and added some drops of white paint. I also added some little gold dots on the white background part to add a little extra interest.

I die cut a red scalloped frame and added to the card with some foam tape. The sentiment was stamped and heat embossed with white powder.

Well that's it for my card and thanks so much for stopping by.

Supplies:

Altenew Leaves & Berries stencil
MFT Die-namics Stitched Rectangle Scalloped Frame die set
Distress Oxide inks
MFT Bitty Holiday Wishes stamp set


Sunday, December 01, 2019

Happy Holidays

Hi everyone,

Today I have a card to share using a new stencil from Gina K that I had recently purchased.


I die cut a red cardstock panel using a stitched rectangle die. I then applied white Gina K. Glitz glitter gel. I just love this gel.

I then layered the panel onto a piece of white cardtock and then a piece of black cardstock.

The sentiment is from MFT stamps which was stamped and embossed with white embossing powder.
The whole thing was popped up with some foam tape onto a white card.

Such an easy, quick and festive card.

Thanks so much for stopping by.

Supplies:

Gina K. Designs Water Droplets stencil
Gina K. White Glitter glitz gel
Simon Says Stamp Stitched Rectangle die set
MFT stamps Bitty Holiday Wishes stamp set
Simon Says Stamp white embossing powder

Tuesday, November 26, 2019

The Magic of Christmas


Hi everyone,

Today I have a card to share with a nice wintery, snowy night background. Simon Says Stamp also has their current challenge theme as Starry, Starry Night so I thought I would enter that here


I started with a piece of navy cardstock that was die cut using a stitched rectangle die. I then placed a couple of different stencils that I have for a very long time (one is brass and the other stainless) and applied some white ink. Once I was happy with the background I added a lot of white paint splatters using Gansai Tambi white paint.

The 2 reindeers and horns were die cut with a piece of white cardstock a couple of times and adhered together.
The sentiment is from MFT stamps. I added a little red pom pom to Rudolph's nose and some sparkle embellishment from Queen & Co.

Well that's it for this card and thanks so much for stopping by.

Supplies:

Simon Says Stamp Stitched Rectangle die set
MFT stamps Bitty Holiday Wishes stamp set
MFT Die-namics Deer Love die set
American Traditional Large Snowflakes stainless stencil
Lasting Impressions Brass snowflake stencil 
Queen & Company embellishments
Memories Unicorn White pigment ink


Wednesday, November 20, 2019

Sending Holiday Cheer

Hi everyone,

I have a card to share today that I created using the Simon Says Stamp Poinsettia Parade die set.

I first started by creating the base of my card by embossing the background with the Lawn Fawn Quilted Backdrop die.

I used the same die to also cut a small panel to mount my flowers on.

I ran the Poinsettia die through my die cutting machine a couple of times so that I would have enough pieces to create my flowers and leaves.

I added some colour to the flowers and leaves by blending some Distress Oxide inks over the pieces.

The sentiment was stamped onto black cardstock and heat set with white embossing powder.

I die cut a panel of red cardstock, added my small quilted panel and arranged my flowers tucking i. The leaves here and there. I added a small pearl to the centre of each flower.


Well that’s it for my card and thanks so much for stopping by.

Supplies:

Simon Says Stamp Poinsettia Parade die set
Lawn Fawn Quilted Backdrop die
MFT Bitty Holiday Wishes stamp set
Distress oxide inks - Candied Apple, Twisted Citron


Tuesday, February 05, 2019

Bunny joy

Hi everyone,

Today I have a card using some Distress Oxide inks, Neat and Tangled's Geometric Circles Stencil and the cute Bubble Over With Joy stamp and die set from My Favorite Things. I just love this cute little set.
As the current Wednesday challenge over at Simon Says Stamp is 'Anything Goes' I will be adding my card. You can find details of their challenge here.


I started by diecutting my panel with a Simon Says Stamp stitched rectangle die. I then taped my stencil to it and blended the background with Squeezed Lemonade and Picked Raspberry.

I stamped the bunny and coloured with Copics. Stamped the sentiment from the same set directly to the card and added some enamel drops from Freckled Fawn.

Well that completes my card and thanks so much for stopping by.

Supplies:

Neat and Tangled Geometric Circles Stencil
MFT Bubble over With Joy stamp and die set
Simon Says Stamp Stitched Rectangle die
Distress Oxide - Squeezed Lemonade, Picked Raspberry
Freckled Fawn Enamel Dew Drop stickers.

Tuesday, July 31, 2018

Balloon birthday

Hi everyone,

Well the summer continues to be nice and hot. Maybe it has also made me a little less creative but I have managed to make a card using a variety of stamp companies including Simon Says Stamp, My Favorite Things, Avery Elle and Sunny Studio Stamps. Also entering this in the current Simon Says Stamp Wednesday challenge where the theme is 'Anything Goes'. Details on their blog here


I used the Simon Says Falling Snow stencil to create my background. The balloons from Sunny Studio Stamps were from a previous project and the bunny was already coloured and die cut previously.

Used the Avery Elle Pierced Mat die to create the black background for my card. Added the cute bunny and balloons and stamped the sentiment also from MFT and that finished my card.

Thanks so much for stopping by.

Supplies:

Simon Says Stamp Falling Snow stencil
MFT Die-namics Stitched Rectangle Scalloped Frame
MFT Bubble Over With Joy stamp and die
MFT Birthday Bears stamp 
Sunny Studio Stamps Birthday Balloon stamp and die
Avery Elle Pierced Mat die

Monday, June 25, 2018

Hooray you did it!

Hi everyone,

Well I am back from my wonderful vacation in Newfoundland. Such a incredibly beautiful, extraordinary place.

The card I have for today was actually completed before I left on vacation but I didn't have time to post it. It will fit perfectly into the theme for the current Simon Says Stamp Wednesday challenge here which is 'Bright and Cheerful'

Here's my card:


I first started by stamping this beautiful image from My Favorite Things and embossing it using white embossing powder. I then went on to colouring each of the sections using different colours of Zigs but not adding any water. It took me a while to colour everything but I was pretty happy with the results. I find the Zig brush pens so vibrant in colour.

I die cut the 'hooray' sentiment first in vellum and then a second time using pink cardstock. The other sentiment from Hero Arts was stamped onto a piece of black cardstock and then embossed with white embossing powder.

Before mounting the panel onto my card base I used a wonky stitched rectangle die to add some interest to the edges.

The background piece and the sentiment were mounted with foam tape and the vellum sentiment was adhered with some glue.

I added some Diamond crystal accents and that finished my card.

Thanks so much for stopping by.

Supplies:

MFT Floral Fantasy Background stamp
MFT Wonky Stitched Rectangle die set
Neat and Tangled Hooray dies
Hero Arts Everyday Sayings
Zig Clean Color Real Brush pens - Turquoise Green, Light Blue, Pink, Peach Pink, Yellow, Pale Green
Lucy's Little Things - Diamonds - Dewdrop

Saturday, May 26, 2018

Bubble kisses

Hi everyone,

Well it's a humid rainy day here so it's a good day to be in my craft room.

I have a card to share that I am entering in the My Favorite Things Color Challenge here.


Here's my card:

I used the adorable My Favorite Things stamp set called Bubble Over With Joy and stamped each of the bunnies and coloured them with Copics. I fussy cut them out because I didn't have the matching die set but since then have made that one of my latest purchases as I know I will be using this set a lot more. 

I die cut a panel using the Inside & Out Diagonal Stitched Rectangle die set and blended in 3 different colours of Distress Inks. When I had decided where I would place each of the bunnies I went ahead and stamped my sentiment.

For the cloud I die cut it first and then ran it through a dotted embossing folder.

The bubbles were stamped with the same inks as the panel and then I applied Glossy Accents to each of the bubbles. 

I applied the panel to the card base which I embossed using the same Inside and Out Rectangle die set and then I added all the elements with foam tape.

Well that's it for this card and thanks so much for stopping by.

Supplies:

MFT Bubble Over With Joy stamp set
MFT Die-namics Inside & Out Diagonal Stitched Rectangle die set
MFT Die-namics Stitched Clouds die set
Distress Inks - Squeezed Lemonade, Tumbled Glass, Worn Lipstick
Cuttlebug Swiss Dots embossing folder

Thursday, May 24, 2018

Birthday wishes


Hi everyone,

Today I have a card to share and which I am entering into the current 'The Birthday Project' challenge on the My Favorite Things blog where the details can be found here.


Here's my card:


I started by blending 3 different colours of Distress ink to my card base and added some water splatters. Once that was done I ran the piece through my die cutting machine using the Horizontal Collage Cover die to cut out all the little squares. I then stamped each image on the square and heat embossed using white embossing powder.
Some of the squares I applied directly and some were popped up with foam tape.

I stamped the sentiment onto a strip of vellum and heat embossed with white embossing powder.

I added a star to each side for a little sparkle and that's it for my card.

Supplies:

MFT Die-namics Horizontal Collage Cover die
MFT Bearthday Bears stamp set
Distress Inks - Salty Ocean, Picked Raspberry, Moved Lawn
Simon Says Stamp white embossing powder
Studio Katia crystal stars