Showing posts with label Cuttlebug. Show all posts

Saturday, June 19, 2021

Teacher themed appreciation cards

 Hi everyone,

Hope everyone is doing well and enjoying some sunshine and beautiful weather.🌞🏝

I have a bunch of teacher themed cards that I made using Sunny Studio stamps and dies and a couple of other companies.

I had so much fun making these which I must say were quite a bit of work as they are multi layer stamp sets.


I used multiple colours of ink pads and and a few different companies.
Jennifer McGuire has a great video explaining how to speed up the process of stamping multiples and how to successfully line everything up. It certainly helped me a lot ❤️

I hope you have enjoyed seeing these cards and thanks so much for stopping by🙏🏻

Supplies:
Sunny Studio Stamps Color My World stamps and dies
Sunny Studio Stamps Teacher Appreciation stamp set
Sunny Studio Fancy Frames Circle die set
Honey Bee Watercolor Lines stencil set
MFT Die-namics Stitched Rectangle Scalloped Frames die set
Cuttlebug Swiss Dots embossing folder 
Distress inks
Altenew inks
Kaleidacolor ink
Gina K Amalgam ink
Lawn Fawn paper
Glossy accents 
Gansai Tambi watercolours


Wednesday, September 02, 2020

Sprinkled with happiness

Hi everyone,

Today I have a card to share using some recently new Lawn Fawn products.


 I started by creating my background using the cloud stamps from the set and stamped them with Hero Arts Pool shadow ink directly onto my card base and then added some Stickles around the top edges of the clouds.

 I stamped the cute little unicorns with Gina K Amalgam black ink and coloured them with Copics.

The unicorns were adhered with foam tape. The sentiment is from Paper Roses.

I added some sequins and that completes my cards.

Thanks so much for stopping by.

Supplies:

Lawn Fawn Unicorn Picnic stamp set
Paper Roses Black & white sentiment sheets pack
Hero Arts Soft Pool shadow ink
Stickles - Star Dust

Tuesday, September 01, 2020

Have a fabulous day

 Hi everyone,

Today I have a card to share using Hero Arts Layering Hibiscus stamp set.


I started by creating my background using the Puffy Cloud borders dies from Lawn Fawn. I didn't have the stencils so I created my own by using the dies. I used them to ink blend several different colours of Distress inks onto a stitched die cut panel.

Once I had my background done I stamped the flowers in different shades of yellow and orange. The leaves were stamped with 2 different colours of green ink.

I attached the panel to my card base and then added the flowers and leaves laying some flat and adhering some with foam tape.

The sentiment is from Paper Roses sentiment pack set. I adhered a few crystals to the background and some Stickles to the centre of each flower. 

Well that completes my card and thanks so much for stopping by.

Supplies:

Hero Arts stamp set CL868
Lawn Fawn Puffy Cloud Border die set
Simon Says Stamp Stitched Rectangle die set
Paper Roses Black & White sentiment sheets pack
Inks - Altenew, Hero Arts, Tsukineko Dew Drop, Distress inks


Monday, August 31, 2020

Aloha Missing your smile

Hi everyone,

Today I have a card to share using some Alcohol Pearl inks and an Alcohol Lift-ink pad.
When I made this card I had my daughter in mind who lives in HawaiiI and I thought all the different colours were a nice mix.

I started by blending 3 different colours of Alcohol Pearl inks onto a piece of Yupo paper and achieved such an array of  beautiful colours. Once dry I used my Alcohol Life-ink pad with a large MFT background stamp to stamp directly over my blended background. The design is very subtle in the background.


I then die cut the panel using once of the larger Inifinity Hero Arts Postage Stamp dies. I die cut the Aloha several times with white cardstock and glued them altogether to create a thick sentiment. The other sentiment was cut from a Paper Roses sentiment paper pack.

I adhered the whole panel to my card base with foam tape.

Well that's it for this card and thanks so much for stopping.

Supplies:

Alcohol Pearls - Intrigue, Sublime and Tranquil
Alcohol Lift - ink
My Favorite Things Floral Fantasy stamp
Hero Arts Inifinity Postage Stamp die set 
Lawn Fawn Aloha die
Paper Roses sentiment pack
Yupo paper


Sunday, August 23, 2020

Bright side

 Hi everyone,

Today I have a card to share that I created using a stencil from Honey Bee and some Distress Oxide inks.

I have made a few cards lately but haven't posted them as I have been going for super long power walks, Pilates and Yoga outside and generally enjoying the beautiful summer weather without actually spending time with anyone. Oh, and throwing in a couple of Zumba online classes each week. 

Keeping the social distancing thing going as long as we need to but I must admit I do miss my gym friends but don't feel comfortable going back to the gym just yet.

Anyways, here's my card.


I first die cut my panel using a stitched rectangle die from Simon Says Stamp. Which by the way is one of my go to dies for cardmaking. I use it a lot.
I taped down my stencil to my panel and then started to blend each stripe with a different colour of DO ink using my blending brushes. Distress Oxides blend so beautifully that it makes the stripes look as though they were painted onto my panel.

Once I was finished blending I adhered my panel to my card base using some foam tape.

The sentiment is from Paper Roses which I cut to size and foam mounted to my panel as well.

This was such a quick and easy card to make. 

Well that's it for this card and thanks so much for stopping by.

Supplies:

Honey Bee Watercolor Lines stencil
Simon Says Stamp Stitched Rectangle die
Paper Roses Sentiment sheets
Distress Oxide inks - Squeezed Lemonade, Spiced Marmalade, Candied Apple, 
Picked Raspberry and Wilted Violet

Wednesday, July 29, 2020

Simple thanks card

Hi everyone,

Today I have a card to share that I created using a Hero Arts Palms Fancy die. I just love simple black and white cards and this one would have also been perfect for a Sympathy card.

Oh well. Another time.


I die cut the Palms die with white cardstock. I thought about layering a couple of palm die cuts together but decided just to glue the one die cut piece onto my black panel.

The black background piece was die cut using a large stitched rectangle die and a piece of black cardstock.

I stamped the sentiment onto a piece of white cardstock with black ink and then layered that onto a piece of black cardstock. It helped the sentiment stand out against the white palm die cut.

I added a few white pearls for some accent and that's it for this quick and easy card.

Thanks so much for stopping by.

Supplies:

Hero Arts Palms Fancy die
Simon Says Stamp Stitched Rectangle die set
Simon Says Stamp Thanks stamp set

Monday, July 06, 2020

Celebrate Balloons

Hi everyone,

Today I have a card to share using a fun Balloon stencil from Neat & Tangled and some Distress inks.


I started first by creating the striped background on my card with a Simon Says Stamp Diagonal Stripe stencil and some black ink.

I then created my panel using the 2 stencils from the Balloon set. and ink blending various colours over the stencils. I added some water droplets to the balloons and some little strings and bows to each of them with a fine black marker.

I die cut the Celebrate sentiment from a piece of shiny black cardstock and added that to my balloon panel. The rest of the sentiment was stamped with black ink just under my die cut.

Well that's it for my card and thanks so much for stopping by.

Supplies:

Neat & Tangled Balloon Duo stencil set
Simon Says Stamp Diagonal Stripe stencil
Avery Elle Sentimental Stamp and die set
Distress inks

Thursday, July 02, 2020

Kindness changes everything

Hi everyone,

Today I have a card to share created with a Bold stripes die and some Distress oxide inks.


I started by die cutting a panel from white cardstock and using that piece as my stencil. I taped that panel piece to a piece of white cardstock and then applied 3 different colours of ink with my Taylored Expressions blending brushes. I left 2 strips in the middle not inked so I can have room for the sentiment pieces.

Once the blending once complete I die cut the piece using a large dotted rectangle die.
I added the panel to my white card. The sentiments are from Paper Roses which I cut out. I added those to my card panel with foam tape and then die cut 2 different colours of leaves and adhered those to the panel also wrapped with a little gold/natural twine from Lawn Fawn.

I really love the sentiments in the Paper Roses pack as there are so many of them and all for different occasions.

Well that's it for my card and thanks so much for stopping by.

Supplies:

MFT Die-namics Bold Stripes Die
Lawn Fawn Small Dotted Rectangle stackables die set
Marianne Design Creatables die set LR0227
Paper Roses Black & White sentiment sheets
Distress Oxide inks

Tuesday, June 16, 2020

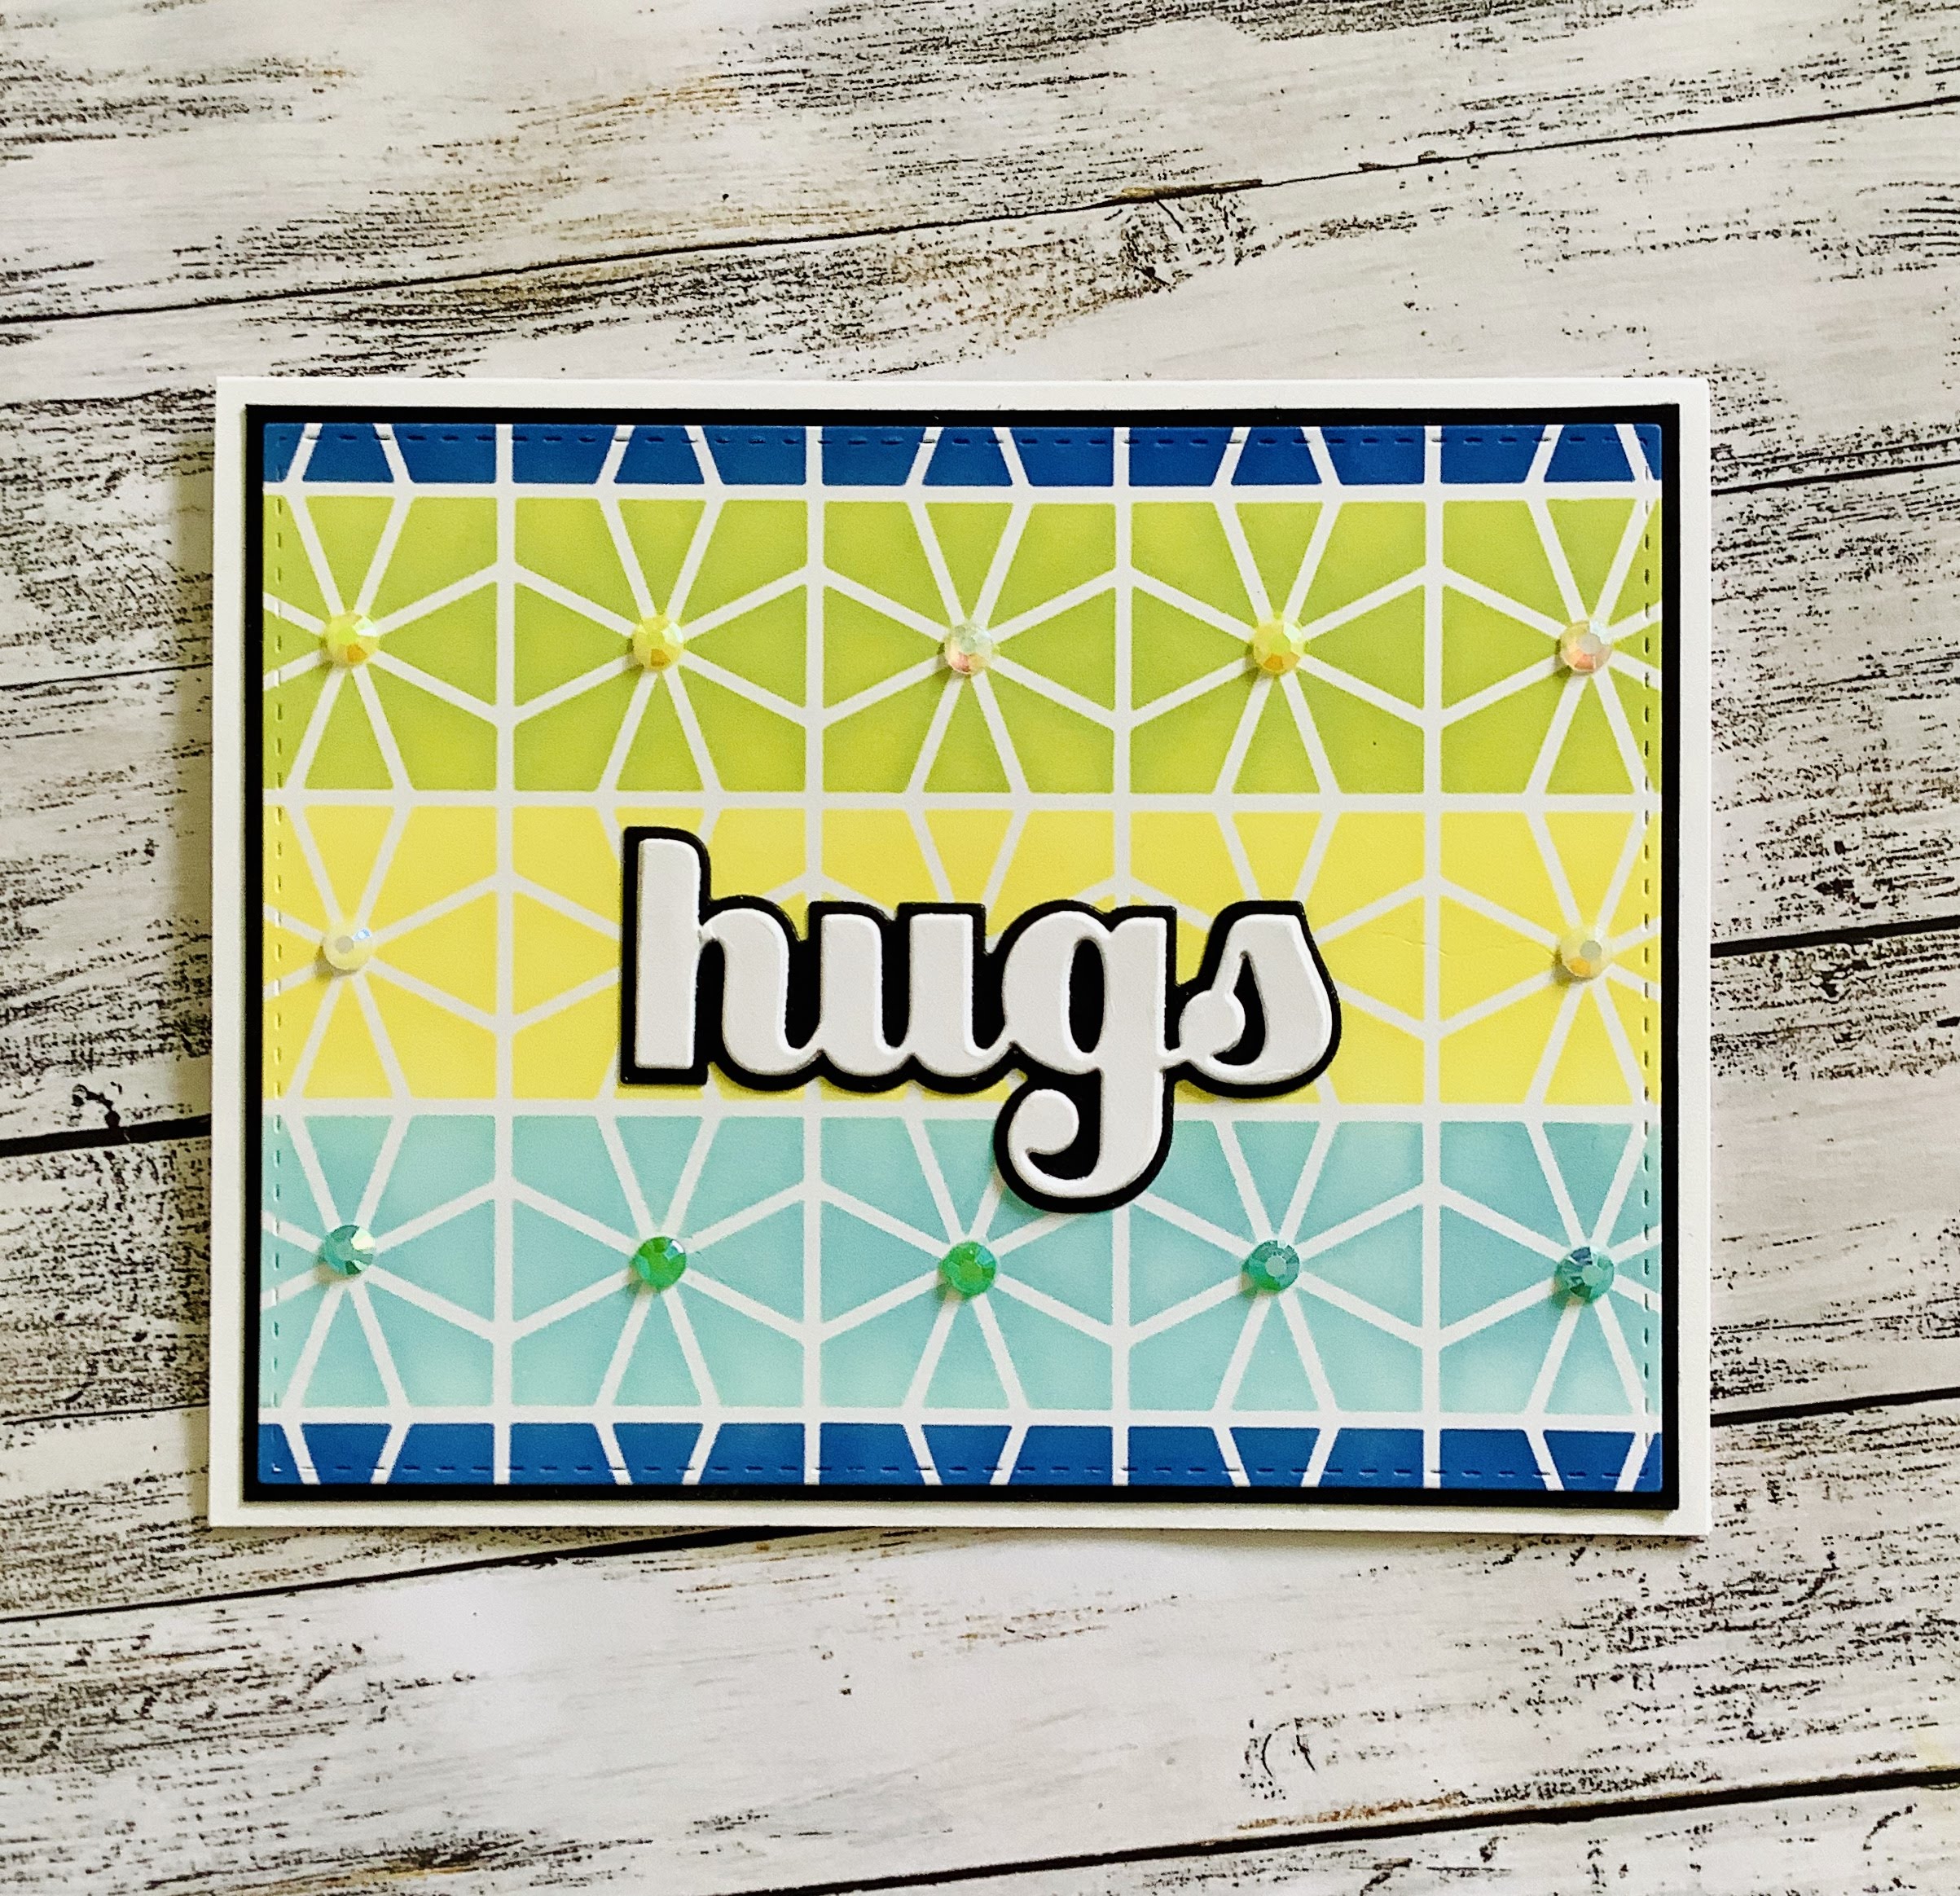
Big hugs

Hi everyone,

Today I have a card to share using a stencil and some ink blending.


I started by creating my background using a stencil from Neat and Tangled. I masked off a section at a time of the stencil and ink blended the colour using 4 different colours of Distress inks.

I die cut the panel using a large stitched rectangle die from Simon Says Stamp.

I layered the panel onto a piece of black cardstock slightly bigger than my finished panel.

The sentiment was die cut from both white and black cardstock pieces.

For the final touch I added a rhinestone gem in the centre of each square.

Well that's it for my card and thanks so much for stopping by.

Supplies:

Neat & Tangled Geometric Circles stencil
Simon Says Stamp Stitched Rectangle die set
Birch Press Design Big Hugs Sugar Script die set
Distress Oxide inks - Tumbled Glass, Squeezed Lemonade, Twisted Citron, Blueprint Sketch
Hai Rainbow Rhinestones
Taylored Expressions ink blending brushes


Sunday, June 14, 2020

Neon Hello

Hi everyone,

Today I have a card to share that I will be entering into Simon Says Stamp current "Anything Goes" theme on Flickr. You can find it here 


I started by colour blending 3 different colours of Hero Arts Neon ink cubes.

It is a bit tricky to blend over this stencil because the lines are very thin but I think it all worked out.

Once I was finished with the blending I die cut the hello 3 times with black cardstock. I applied watermark ink to the top layer of the sentiment and added some clear embossing powder so I could have a shiny look to my sentiment.

I added some splatters with black paint and then added the Hello to the centre of my panel.

Onto the card base I added 2 strips of neon washi tape at the top and bottom and then adhered my panel to the card.

Well that's it for my card which was quite simple to make.

Thanks so much for stopping by.

Supplies:

Simon Says Stamp Flora stencil
Simon Says Stamp Painted Hello die
Hero Arts Neon Green, Neon Pink and Neon Orange ink cubes
Gansai Tambi black paint
Washi tape

Sunday, May 31, 2020

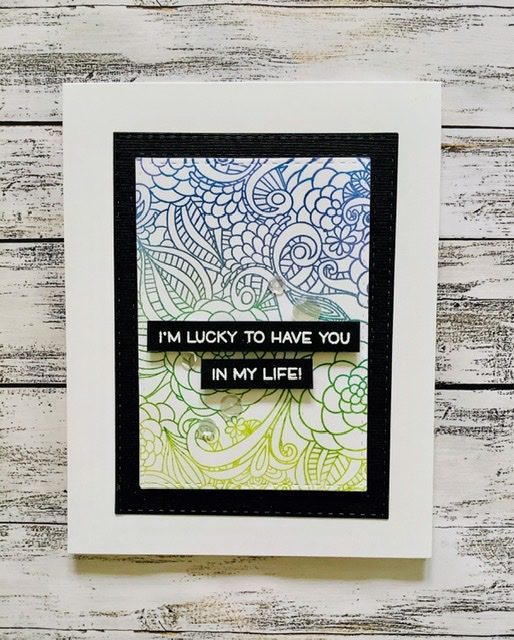
Lucky to have you

Hi everyone,

Today I have a card to share using the large Floral Fantasy background stamp from MFT stamps.


I started by setting the stamp in my Misti rubber side up in the platform. I taped my die cut rectangle piece to the door of my Misti aligning it to the centre of the stamp. I used a Kaleidacolor ink pad which has 5 different colours of ink and inked up the stamp. I had to do this several times in order to get a crisp image. I did use a different ink on the top portion as I wanted to have a dark blue colour with the greens.

I used 2 of the stitched rectangle dies to make the frame for my image from some black cardstock. The sentiment was stamped and embossed with white embossing powder.

I popped both the background and the sentiment pieces with foam tape.

I added a few clear sequins and that completes my card.

Thanks so much for stopping by.

Supplies:

MFT stamps Floral Fantasy Background Stamp
Lawn Fawn Reveal Wheel Friends & Family sentiments Stamp set
Simon Says Stamps Stitched Rectangle die set
Tsukineko Kaleidacolor Fresh Greens ink pad 

Thursday, May 28, 2020

More rainbow cards


Hi everyone,

I have had so much fun making these rainbow cards. Given everything going on in the world at this time it is nice to know there is a rainbow somewhere. Maybe Hawaii!!

For my 1st card I started by creating my cloud background using a stencil and ink blending Unicorn white ink onto a light blue piece of cardstock. 

The clouds from MFT were die cut from a piece of white cardstock which I had embossed using a Cuttlebug embossing folder. The rainbow was die cut using a die from Paper Smooches and the sentiment was white embossed onto a piece of black cardstock using a stamp from Mama Elephant.

I added some glitter to the edges of each of the clouds and that's it for this card.


For my second card I used a rounded rectangle Infinity die set from Hero Arts cutting out each of the colours of cardstock and stacking them together and adding a white embossed sentiment to the middle piece.

To add a little interest to my background I used a heart stencil from Simon Says Stamp and Gina K's Iridescent glitter. Hard to tell in the photo but there is a lot of glittery sparkle going on here.


For my last card I die cut the background panel using a Wonky Stitched rectangle die and then used a couple of Lawn Fawn cloud stencils to create the clouds. The rainbow was die cut using circle dies and coloured cardstock. The sun is Hero Arts and yellow cardstock with little hearts that were created with a stencil. I added the sentiment and some Iridescent Bubbles for a little accent.


Well there you have it for the remainder of my rainbow cards. Thanks so much for stopping by.

Supplies:

1st Card 

Paper Smooches Rainbow die
Spellbinders Large Standard Circles die set
MFT Die-namics Stitched clouds dies
Lawn Fawn Cloud stencils
Mama Elephant Up and Away stamp set (sentiment)

2nd Card

Hero Arts Rounded Rectangle Infinity die set 
Simon Says Stamp Falling Hearts stencil
Mama Elephant Up and Away stamp set (sentiment)
Gina K. Iridescent glitz glitter gel

3rd Card

Spellbinders Circle die set
MFT Die-namics Wonky Stitched Rectangle die set
Lawn Fawn Cloud stencils
Hero Arts sunshine die
Simon Says Stamp Friend sentiment die set
Avery Elle All of Us stamp set (sentiment)
Studio Katia Iridescent Bubbles 


Wednesday, May 13, 2020

Floral hugs

Hi everyone,

Today I have a card to share that using a watercolour technique and some distress inks.


I created my background first and when it was dry I stamped the flower image from Altenew several times over the background. I then die cut the panel with 2 different sizes of Simon Says Stamp rectangle dies. I adhered the large panel to my card base and using the 2 rectangle dies cut a frame from some black cardstock.

I added the frame over the panel and then adhered the smaller panel over top with some foam adhesive. I stamped the sentiment and heat embossed with white embossing powder.

Added some pearl accents and that completes my card.

Thanks so much for stopping by.

Supplies:

Altenew Beautiful Day stamp set
Simon Says Stamp Stitched Rectangle die set
Distress Oxide inks - Squeezed Lemonade, Picked Raspberry, Spiced Marmalade
Pearl gemstones

Rainbow cards

Hi everyone,

Today I have a couple of cards to share with a rainbow theme. As rainbows are everywhere these days I thought I would make a few different cards.
 
I started by creating my rainbow using a circle die from Spellbinders and different colours of cardstock. The white base of my card was die cut using a stitched rectangle die.
The sentiment was stamped with black ink and I added a little glitter heart where there was an open heart image.


The second card was created by using a stencil and dry embossing to create my background piece. The rainbow pieces were created using an Infinity die set from Hero Arts.

I layered the coloured pieces together and then used a white piece for the sentiment in the middle. I die cut several pieces of the white centrepiece and adhered them together so that they would create a nice raised image. The sentiment was stamped with black ink and some clear sequins were added for a little accents.


Well that's it for both of my cards and thanks so much for stopping by. I will be adding a couple more rainbow cards soon so stay tuned.

Supplies used:

Spellbinders Standard Circles large die set
Hero Arts Infinity Rounded Rectangles die set 
Sunny Studio Stamps Happy Home stamp set
Mama Elephant Up and Away stamp set
Honey Bee Fluttering Hearts stencil set
Bazzil card stock


Saturday, May 02, 2020

Kobi birthday

Hi everyone,

Today I have a card to share using the fun Kobi stamp.

I first started by blending my background with a stencil and 3 different colours of Distress inks.


I put the background aside and went onto stamping my present loaded bear and colouring him and the presents with Copics.

I used a line word die and ran that through my machine 3 times using some shiny black cardstock and glued the 3 die cuts together.

I adhered the panel and the bear with some foam tape to my card base and then added the sentiment.

Well that's it for this card and thanks so much for stopping by.

Supplies:

The Crafters Workshop Mini Circle Explosion stencil
Studio Katia Kobi Bearing Gifts stamp
Lawn Fawn Happy Birthday Line Border die
Copics
Distress inks


Friday, May 01, 2020

Thinking of you

Hi everyone,

Today I have a card to share that I created using Studio Katia's Half Striped Cover die.
This is actually quite an easy card to make and so very colourful.


As the die only cuts one half corner of the cardstock I cut it twice and then adhered the 2 die cuts together turning one so that I had the stripes cut in each corner. 

I then used multiple colours of cardstock and the die again to cut all the different colours. I layered the strips back into the openings. The sentiment was stamped onto the middle white strip of cardstock.

Well that completes my card and thanks so much for stopping by.


Supplies:

Studio Katia Half Striped Cover die
Hero Arts Everyday Sayings stamp set.
Lawn Fawn cardstock 
Various other Bazzil cardstock

Monday, April 27, 2020

Good vibes

Hi everyone,

Sending Good Vibes. I must admit this is my first time using a Concord & 9th turnabout stamp set. It was fun to see the final result but a little note to myself for next time is to make sure that I stamp each turn a few times. I find the colours are just a little bit too light for my liking. Live and learn! Nevertheless it does make for a pretty design. The image is quite large and this makes for a 5.25" square card.


I used 4 colours of ink from various companies when stamping my images. I used some turquoise glitter cardstock for the sentiment and added some confetti for a little extra sparkle.

Well that's it for my card and thanks so much for stopping by.

Supplies:

Concord & 9th Tropical Vibes Turnabout stamp
Concord & 9th Tropical Vibes dies
Studio Katia Majestic Confetti


Saturday, April 25, 2020

Each day is a new beginning

Hi everyone,

Today I have a card to share that I created using Simon Says Stamps fun Work Out stamp set. Being a Yogi myself I really love this stamp. The sentiment is perfect for the time we are in right now as each day is truly a new beginning. We will get through this and be even stronger when we do. Namaste!


I used a stencil for my background piece and blended with 2 different colours of Distress inks.

My Yoga girl was coloured with Copic markers. I used a sentiment from the same set to stamp in the centre of the stencil.

I layered my background piece onto a piece of red cardstock and then added some foam pieces to the back of the girl and added her to my card.

Well that's it for my card and thanks so much for stopping by.

Supplies:

Simon Says Stamp Work Out stamp set
Stencil Girl Products 6x6 stencil
Distress inks
Copics

Friday, April 24, 2020

Thankful for you

Hi everyone,

A pretty heart stencil card for today dedicated to all the wonderful hard working people here in Canada and around the world for keeping us safe and fed.  We just can't express in enough words how very thankful we are to them putting themselves at risk every single day.


I used a Simon Says Stamp stitched rectangle die to cut out my background piece and then used my pink blending brush from Taylored Expressions to fill in the stencil with a heavy hand and went with a lighter hand towards the centre of the stencil using Picked Raspberry Distress Oxide ink.

The larger sentiment was die cut from shiny black cardstock and the smaller sentiment was die cut once with white cardstock and then again with the same shiny black cardstock and the letters were inlaid into the sentiment.

I added a little glitter to the two o's and the r in the You sentiment to give in a little sparkle.

Pink pearl embellishments were added and that completes my card.

Thanks so much for stopping by.

Supplies:

Honey Bee hearts stencil
Hello Bluebird dies
Simon Says Stamp Stitched Rectangle die set
Distress Oxide ink - Picked Raspberry
Taylored Expressions blending brushes

Monday, April 20, 2020

Sparkly stencilled birthday card

Hi everyone,

Well it's been a while since I've posted anything here. I have been busy creating cards, making masks and baking a lot. I hope everyone is doing the social distancing thing to try and flatten the curve although here in Quebec the situation is not great, especially in seniors' residences. We have the most cases in Canada. Hopefully we can get the numbers down soon and start to resume our new normal life, whatever that looks like. Anyways stay healthy, stay safe!

With all that being said here are some cards that I have done lately.


And here's another one that I made for Easter for my cute little granddaughter. The easter egg changes to a different colour with every turn of the wheel.


Hope you enjoyed seeing these and thanks so much for stopping by.

Supplies:

Gina K. Stencil and glitter paste
Sunny Studio Stamps - bunnies
Lawn Fawn stencil, stamps, dies
Hello Bluebird stamps
Simon Says Stamp stitched rectangle dies